Now that we modded an Oktava MK-219, it's probably only fair that we take on its younger brother, the MK-319.
The 319 looks a lot different than the 219, but the circuit is the same. We'll look at that in the next post.
But first let's get the thing apart and do the body and headbasket damping mods.
 Here's our unsuspecting MK-319 about to be opened up. Where the MK-219 is sort of flat and rectangular, the MK-319 is cylindrical.
The body is a lot heavier than the MK-219 - presumably to solve the known resonance issues with the older model.
First step is to remove the bottom threaded ring.
 Remove the one screw at the bottom.
 Then remove the screws around the headbasket.
This is not rocket surgery. Although given the shape of the microphone, we can pretend we are working on Korabl-Sputnik 2, the Vostok spacecraft that carried the legendary Belka and Strelka into orbit.
 Finally we remove the panel for the pad and bass-cut switches.
 Rather than leave small screws and parts on the bench where they may get lost, I'm trying to get in the habit of using a magnetic parts tray.
 The switch panel can be pushed out of the body from underneath.
Then we unscrew the PCB from the panel.
 And the whole chassis assembly can then be slid out of the body.
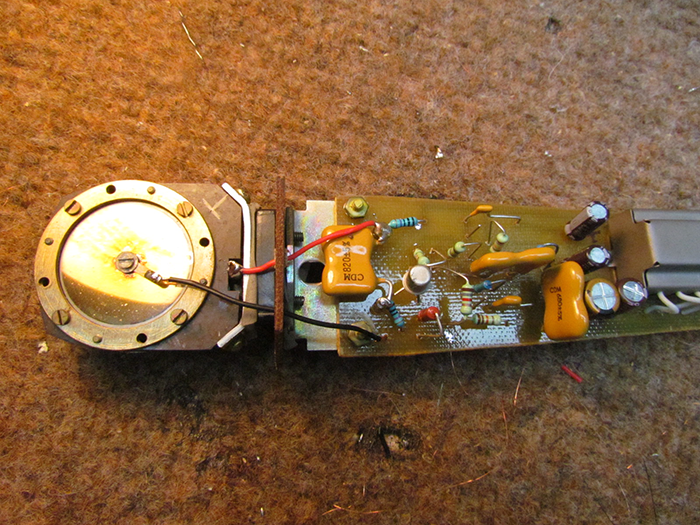
 Check out the long wire run from the capsule to the switches. The screwdriver is pointing to the hot lead. It runs from the capsule (spacecraft reference not intentional...) all the way up to the switch PCB, then back.
In the MK-219, the run is short, since the switch circuitry is on the board. But this is done differently.
I'm going to remove all of the wiring and the switches, since I won't use them and since they degrade the signal when they're used. I'll replace the wiring with shorter runs of better quality wire, as I did on the MK-219.
Those wire runs can't help things either. The extreme length adds a lot of capacitance, and in this case, capacitance is not our friend.
 I unsoldered the switch wiring and temporarily soldered the ends together so I can test the mic as I work on it.
Before I work on the electronics, I decided to fabricate an aluminum panel to replace the switch panel, since the switches won't be used.
I'm just using thin sheet aluminum from the Despot.
 It took a couple tries to get it decent. Here's the finished panel. Bye bye switches.
I need a decal in Russian that says "No User Serviceable Parts Inside" to put on the panel.
I put a square piece of CLD tile on the inside of the panel to deaden it. That thin aluminum just rings otherwise.
 The MK-219 has resonance issues with the body. Oktava made a nice thick body for the MK-319 which doesn't ring, but the headbasket does.
So we take out the inner mesh to help damp the headbasket, and open it up to let more sound in.
 I cut some of the CLD tile material into thin strips and painted them black. Then I stuck them into the headbasket. There are two strips running around the circumference of the basket, and two along the vertical supports.
There's also a circle I cut and put on the top mesh.
The basket now 'thunks' more than ring.
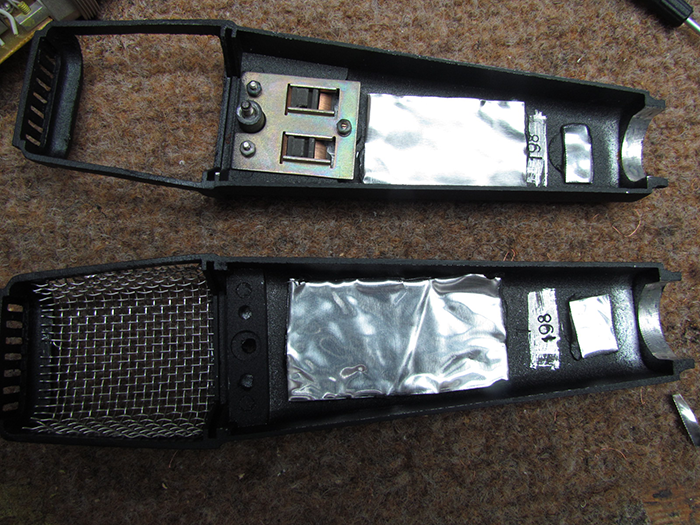
 As I mentioned before, the body of the MK-319 is pretty solid. But that didn't stop me from putting some strategically placed tiles in there anyway.
Next up: modding the electronics and replacing the Russian FET with a different one.
The 319 looks a lot different than the 219, but the circuit is the same. We'll look at that in the next post.
But first let's get the thing apart and do the body and headbasket damping mods.

The body is a lot heavier than the MK-219 - presumably to solve the known resonance issues with the older model.
First step is to remove the bottom threaded ring.


This is not rocket surgery. Although given the shape of the microphone, we can pretend we are working on Korabl-Sputnik 2, the Vostok spacecraft that carried the legendary Belka and Strelka into orbit.


Then we unscrew the PCB from the panel.


In the MK-219, the run is short, since the switch circuitry is on the board. But this is done differently.
I'm going to remove all of the wiring and the switches, since I won't use them and since they degrade the signal when they're used. I'll replace the wiring with shorter runs of better quality wire, as I did on the MK-219.
Those wire runs can't help things either. The extreme length adds a lot of capacitance, and in this case, capacitance is not our friend.

Before I work on the electronics, I decided to fabricate an aluminum panel to replace the switch panel, since the switches won't be used.
I'm just using thin sheet aluminum from the Despot.

I need a decal in Russian that says "No User Serviceable Parts Inside" to put on the panel.
I put a square piece of CLD tile on the inside of the panel to deaden it. That thin aluminum just rings otherwise.

So we take out the inner mesh to help damp the headbasket, and open it up to let more sound in.

There's also a circle I cut and put on the top mesh.
The basket now 'thunks' more than ring.

Next up: modding the electronics and replacing the Russian FET with a different one.