A start capacitor increases the motor's starting torque for a short time to bring the motor up to about 75% of the motor's speed and then is taken out of the circuit by a centrifugal switch. (You saw the switch on a previous post).
I always replace old capacitors when I service gear. You may recall that the old cap was flat and rectangular in shape. Modern ones are cylindrical.
This presented a problem when installing the new cap. You can see a test fit in the picture above. It actually lays nicely in the motor's mounting bracket.
 The problem, however, is that the cap is too tall to let the mounting plate sit flat on the bracket as you can see here.
Originally I thought I might be able to grind away some of the plate and get some clearance, but I needed about 1/2 an inch of clearance and the plate is a bit thinner than that.
Hmmmm.
The obvious answer was to just mount the capacitor externally on the motor. I could have just attached it to the motor with some wire ties, but that seemed to be a bit TOO rednecky, and it would expose the cap and wiring to dirt and sawdust.
Then it hit me - why not a 'can' attached to the outside of the motor which would hold the cap?
And with that, I became Metal Working Boy!
I did take a couple years of metal shop in high school, not that it helped me now. Do high schools even have shop classes now?
Armed with a piece of thin sheet aluminum, I set about making a cylinder. I watched a fascinating video on You Tube where a car restorer, really an artist, took a badly damaged aluminum fender on a Cobra and sculpted it masterfully back to shape.
One lesson I learned was that heating aluminum makes it easier to work with.
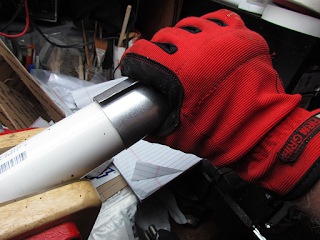
So I fired up my proprane plumbing torch and went to it. I had cut the sheet to the size I needed, and heated it up for a couple minutes.
Then I used a hunk of 1 1/2 inch PVC pipe as a form to bend my cylinder.
It worked! Golly.
Side note: I don't know about you, but sometimes when I work on these kinds of things, my mind rambles a bit. In this case, I thought of a classic Who interview with Russell Harty from 1973. (Look for the clip in The Kids are Alright movie).
Harty asks each member of the Who in turn what they did before joining the Who:
Russell Harty (to Roger): And what did you do?
Roger Daltrey: Sheet met-ul wuh-kuh.
Harty: Sheet metal?
Daltrey (nodding): Yeah.
So there you have it. Sheet met-ul. Yeah.
(I won't tell you about the rest of the clip other than saying it is very much worth finding and watching. IF you are a Who fan).
Skipping ahead a few steps, here's the finished can. I pop-riveted the cylinder together, and cut two circles for the top and bottom. The bottom is epoxied to the can with JB Weld.
I drilled two holes and slotted them to fit over the two screws on the access plate on the end of the motor. The top has 2 tabs to screw onto the can, and a hole for the wiring. And I painted it with grey hammered finish paint. A bit crude, but it works.
You'll see it all connected in a bit - you can see the capacitor sitting in it in this picture.
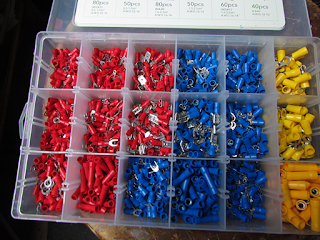
The new cap has quick-disconnect terminals for its wiring.
So I picked a couple of appropriately sized female connectors out of my assortment. I have a more-or-less lifetime supply.
I soldered and then shrink insulated new wires onto the old motor wiring. These leads will run to the capacitor.
You may be asking yourself, "isn't that old cloth-insulated wire dangerous?" Not really. It's actually cloth over paper of some sort from what I can tell. And in any event, I have plenty of old radios and amps running just fine with cloth insulated wiring. If it was worn, sure, I'd replace it, but it's in good shape.
The old rubber-insulated line cord, on the other hand, is most definitely shot.
I'm replacing this with a modern 3-conductor 12 gauge (!) cable. So the motor (and the press...) will be properly grounded.
I probably could have gone with 14 gauge or even 16 gauge wiring, but what the heck.
The cord is also 12 feet long!
Here's the cap connected.
At this point, I temporarily wired it all up and...it worked fine!.
(Although the motor tried to jump onto the floor when it first started up...should have held it down.)
I wanted to take a stab at getting the dent in the nameplate out before I put it all back together.
So I made two cauls - I suppose in the body shop world these would be 'dollies' - shaped to the radius of the nameplate.
I'll hammer on these and hopefully get the dent out.
As with the cap can, I heated the aluminum up a bit. Not too hot - I was concerned about not damaging the paint on the label.
Then I chucked one dolly in the vise, and hammered on the other one. That's actually my fretting hammer doing the work here.
Hard to tell exactly from this shot, but the dent came out! Unfortunately the paint was scraped where the dent happened, but it doesn't look too bad.
And here we have the finished wiring.
The green power lead goes to ground - I put a ring connector on the lead and ran it under one of the mounting bolts.
The black, hot lead, goes to the switch. Again, there is a ring connector there as well. The other side of the switch goes to the motor start switch. And finally, the white, neutral lead is soldered to the other motor lead. The purple shrink tubing carries the new wiring out to the start cap.
The neutral lead on the old cable was pigtailed to a motor lead and held on with a wire nut. But now, we have everything soldered and using proper connectors. The connectors are crimped and soldered. And note the strain relief on the cable where it enters the housing.
Note how the can attaches to the motor. There are two screws that hold the wiring access plate to the end bell. I just left them slack a touch so the slotted holes I made in the can could slip over them.
There's a grommet the wiring passes though - and the purple shrink insulation covers the leads to the cap. I wanted to use black, but purple was the only large insulation I had on hand!
I had marked where the nameplate should line up when I first took it off. Now we just line it back up, slip the bent ends together and hammer them back down.
The reassembled motor.
When the motor is mounted back on the drill press. the can will be on the bottom, and the wiring that enters the can will be up next to the press.
If the capacitor ever needs to be replaced, it's easy to get to now.
I polished the nameplate. Looks pretty good!
The case and the acorn nuts are polished and waxed also.
It lives, the motor lives!
If you look closely, you'll see the shaft spinnng. It runs great! Quiet and smooth.
Everything got polished, even the switch plate, the switch screws, and the plastic switch handle.
Now I'll break down the drill press head, and put new bearings in it.
The complete restoration saga
Part 1 - Beginning
Part 2 - Electrolysis to Remove Rust
Part 3 - Grinding to Remove Rust
Part 4 - Leveling Base Table
Part 5 - Recreating Model Number Label
Part 6 - Refinishing Base
Part 7 - Removing Motor
Part 8 - Motor Disassembly
Part 9 - Motor Bearing Replacement
Part 10 - Start Capacitor and Motor Reassembly
Part 11 - Removing Threaded Jacobs Chuck
Part 12 - Spindle Removal
Part 13 - Quill Disassembly
Part 14 - New Quill and Spindle Bearings
Part 15 - Engine Turned Aluminum Trim Proof of Concept
Part 16 - Engine Turned Aluminum Trim
Part 17 - Cleaning and Polishing Hardware
Part 18 - Jacobs 633C Drill Chuck Restoration
Part 19 - Cleaning and Polishing Column
Part 20 - Reassembly Begins
Part 21 - Restoration Completed


What part number of the capacitor did he use
ReplyDelete