Since I'll need to clamp the neck straight once it's heated, I figured I should make a caul to fit the back of the neck so it doesn't get all hacked up by the clamps.
First I transferred the approximate profile of the neck to a hunk of pine that will become a caul when it grows up.
You can see I just used a compass to follow the curve of the neck and roughly transfer it to the pine.
Here's the mark I made on the end of the block.
Note that the neck is narrower at the nut end, and it widens toward the body, and naturally, the profile changes too.
So one end of the caul-to-be has the shape of the nut end, and the other end has the closer-to-the-body end.
Then I made lines connecting the two profiles on the ends.
The nut end (narrower) is nearest the camera here and the body end is on the far end.
Now I need to cut the wood following the marks and create a sort of reverse neck profile.
I used a 1/4 inch wide blade on the bandsaw and hacked out the shape. It's a bit rough, but it doesn't have to be super accurate.
If I was really good with the bandsaw, I probably could have followed the curver closer, but I am not, so I didn't.
So I used a chisel to cut away more material in an effort to make the channel more rounded and shaped more like the profile of the neck.
Fortunately it's pine and its soft, so I did ok with the chisel.
During this phase, I tested the fit of the neck a number of times to get it to fit well, so it would sit level when it's clamped.
.
I tried my nice Japanese rasp to smooth the thing out, but it's a bit too short. Memo to self: get a bigger rasp.
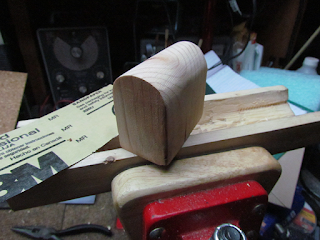
Then I got this crazy idea of making a curved sanding block to sand the profile.
It worked ok...close enough that I could move forward.
You always need more clamps.
Here I had cut some cork to use as a facing for the caul. It's really just three long pieces - and it was glued into the channel/profile in the caul.
I though the cork might flex enough the closely follow the curve, but it didn't. It's not critical though. I bet really thin cork would flex more, bu then it might also crush too much under clamping pressure.
After the glue dries, I cut the excess cork off the ends and sides of the caul.
Then it was over to the ROSS to sand the cork smooth with the pine.
Here's the finished caul alongside the neck.
The seams between the cork pieces won't be an issue. The main thing is the caul will act like a little cork-lined bed for the neck and protect it when it's clamped up.
End view showing the profile. The most fun part of this whole thing was sanding the cork level with the pine. Looks really cool I think.
And a test fit.
Since the caul has the neck's profile cut into it, the neck fits nice and level.
After the neck is back on the guitar, I'll pull the frets and heat the neck, put some square blocks on the fingerboard side, and clamp the neck straight. You can see why I needed a caul for the back of the neck - the clamps will need something to grab on to.
I've found I'm starting to enjoy making custom jigs and pieces like this. At first, I wanted to rush and get back to the repair (or construction), but now I realize these special things are rewarding to make.
All posts in the 1931 Martin 0-18T Restoration Project:
- 1931 Martin 0-18T Guitar Restoration and Repair, Pt. 1
- Neck Removal on 1931 Martin 0-18T Guitar: Restoration and Repair, Pt. 2
- Trimming the Neck Heel for Reset: 1931 Martin 0-18T Restoration and Repair, Pt. 3
- Shimming Guitar Neck Dovetail and Finish Chip Repair: 1931 Martin 0-18T Restoration and Repair, Pt. 4
- Caul for Heat-straightening Guitar Neck: 1931 Martin 0-18T Restoration and Repair, Pt. 5 - This page.
- Reparing Acoustic Body Cracks: 1931 Martin 0-18T Restoration and Repair, Pt. 6
- Making a Tortoloid Pickguard: 1931 Martin 0-18T Restoration and Repair, Pt. 7
- Heat Straightening Bowed Guitar Neck: 1931 Martin 0-18T Restoration and Repair, Pt. 8
- Fret Marker Installation and Filling Fingerboard Chips: 1931 Martin 0-18T Restoration and Repair, Pt. 9
- Compression Fretting to Correct Upbow: 1931 Martin 0-18T Restoration and Repair, Pt. 10
- Completed 1931 Martin 0-18T: Restoration and Repair, Pt. 11


0 comments:
Post a Comment