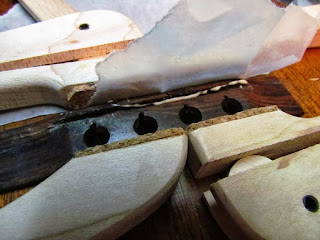
Martin glued these saddles in. Since they used hide glue, the removal technique is to heat the saddle and pull it up. I did this on my tenor guitars, and it worked great.
Not so on this ukulele. I heated it a number of times and it won't budge. In fact, I cracked some pieces off the top of the saddle trying to get it out. I was hoping to get it out in one piece, but it was just not to be.
So I moved to Plan B, which is the 'cut-and-collapse' method. What you see in the first picture is how I made a cut in the middle of the saddle using a very thin and super sharp Japanese saw. (Only the thinnest Japanese can be made into saws). Hopefully I can squeeze the sides of the saddle inward to collapse it and remove it.
Long story short, the bugger still wouldn't move. I used a chisel to try and (carefully) loosen it up, but I wound up cracking the front of the bridge. I suppose I'm in trouble with the Brazilian Rosewood Authorities for doing that.
However, just one clean piece of wood came off and it allowed me to get under the saddle to the glue joint whereupon I could free the saddle up.
The saddle is ivory - I saved the pieces for who-knows-what in the future.
The chunk that came off the bridge glued up perfectly. And yes, I did get that squeeze-out.
I just used Titebond - I needed more working time to get it lined up. Would have preferred hide glue, but for this repair it didn't make sense.
Did I mention the bridge is Brazilian rosewood?
Now I need to thickness sand a bone blank for the saddle. I've been using my ROSS do do this, but the blanks aren't always square, since there's some 'give' in the sanding belt.
The instructions for the fingerboard levelling block I just got mention using it to shape saddles and nuts since it's perfectly square. I used my regular carpet-tape-holding-the-blank-to-a-board method and put sandpaper on the block. Works a treat.
You may notice my dial caliper in the background. I even measured the slot to get a perfect fit. Usually I just do trial-and-error. (For the record, the slot measured .091 of an inch).
Much better results this time. The saddle passes the Dan Erlewine "you should be able to pick up the guitar with the saddle" tightness test. I think it's safe to assume the test applies to instruments other than guitars.
I was also careful not to finish sand and polish the saddle where it sits down in the bridge slot. Every once in a while, I sand them too thin and lose the tight fit.
Shape the top, cut it to length, and then file the ends.
This is the old Martin "through-cut" or simply "through" saddle. I love the look, but it's a lot more work than a more modern Martin "belly" saddle.
The finished saddle. I used bleached bone to hopefully resemble the original ivory, sanded it up to 8000 grit and polished it with swirl remover. I also put some nice ebony pins on the bridge - the ones that came with the ukulele were plastic.
That Brazilian rosewood is pretty porous. That's actually a pore near the end of the saddle - it looks like a crack!
(How many page views will I get by mentioning Brazilian rosewood in this post?)
Can you see where I glued the hunk back on?
Last step was to put on a nice rosewood strap button. This will be a player for sure.
In fact, I finished the uku just in time to take it to a jam/rehearsal later that day. The action and playability is the best of all my Martins. Hardly takes any effort to play, but has no buzzes. It's also pretty bright and loud too. It really cuts through a roomful of Kalas.


0 comments:
Post a Comment