I've mentioned this before, but it's ironic that we call Fender necks "bolt-on" when in reality they use screws!
Anyway, we need to drill out the existing mounting holes to accept threaded inserts. I've done this before using a 7.25 inch radius neck sanding block. But this neck is a 9.5 inch radius, and in any event just using a block to hold the neck in place is asking for trouble.
The holes need to be drilled exactly perpendicular to the neck and they have to be on-center in order that everything will align correctly. After some thought, I cooked up a simple jig to hold the neck heel square for drilling the holes and putting the inserts in using a drill press.
You can see it above. It's really just two short blocks that hold the heel. One of them is glued and screwed into the long plank the neck rests on. The other has 3 wood screws that ride in a slot so the heel can be put in, and then the block slid in and tightened up. I put the neck into the jig, then I used a small level to ensure everything was square - I needed a shim (see it at the headstock end of the neck) to level everything exactly. Then the whole enchilada gets clamped to the drill press table.
Drilling the holes.
The neck heel actually has a taper to it. In making the jig, I lined up the blocks with the neck in it, positioned them, and then clamped and glued the left-side block down so it followed the neck taper. The right-side sliding block can be adjusted to fit the taper as well as the width.
This worked pretty well. I think I'll probably refine it a little in the future, but it does what I need it to.
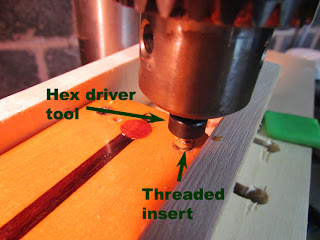
After each hole was drilled, I put the respective threaded insert in. Each one was lined up on the drill press head without moving it from the position it had been in when drilling out the holes.
I've tried some different inserts, and this time I went with hex-drive inserts from McMaster-Carr. I sprung for the $7.95 hex driver tool - a good thing. The tool is just a drive you can insert into a drill chuck. I just put everything in place, brought the chuck down, and turned it by hand. It easily threaded right in, nice and square.
The inserts take 8-32 threads, so I used stainless machine screws - 1.75 inches in length - to fit the neck.
The neck now has a great solid feel.
Now I need to string it up and make a new nut.
Before I can put strings on it, I need to open the mystery can.
What could be in it?
Hmmm.
A cloth bag and some stuffing.
I guess when you make such a beautiful product it deserves some special packaging.
This is a Mastery bridge. The ultimate bridge for "offset" guitars (i.e. the Jazzmaster and Jaguar).
It's pretty spectacular.
The machining is absolutely first-class. Very reasonably priced considering the fantastic quality.
It's even patented.
That "613" might be a serial number, I'm not sure. UPDATE 31 OCT: It's a batch number.
Unlike the original Jazzmaster bridge, this one locks down solid. Here's more info on the Mastery bridge.
The mounting posts are a close-tolerance fit to the body thimbles. You tighten the posts after you've set the bridge (string) height.
And there's a vented screw for height adjustment. The Mastery folks provide three hex wrenches with the bridge - one for the post, one for the height screws, and one for the intonation screws.
Here's how the top of the post tightens to lock the bridge into place. I love functional mechanical things that are also art!
In the next installment, I'll make the nut and do the final set-up.
All Posts on the Squier Vintage Modified Jazzmaster Modification Project:
Part One: Starting DisassemblyPart Two: Removing Factory Wiring
Part Three: Shielding
Part Four: Wiring Modifications and Curtis Novak Pickups
Part Five: Neck Inserts and Installing Mastery Bridge (This page)
Part Six: Buffalo Bone Nut and Final Setup
Part Seven: Modified VM Jazzmaster Visits the Garden
"Ching" Rhythm Circuit Revisited: 28 April 2014


Hi there, just wondering which mastery bridge you purchased? I've got an Indonesian squire jaguar and am unsure which one will fit.
ReplyDeleteHi -
ReplyDeleteSee this page on Mastery's site: http://www.masterybridge.com/which-bridge/
What I bought for mine is the "M1 Kit" which is the bridge and the thimbles. I'm reasonably sure that kit would fit yours as well. Mine is made in Indonesia also.
You will not be disappointed with the bridge. And now I see they're selling vibratos too! Wow.