With that in mind, I just put together a very simple ceiling rack/hanger to stash guitars and other instruments on.
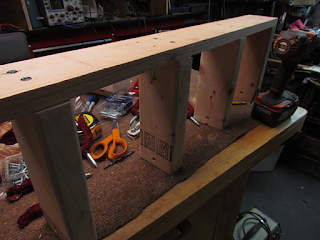
Here's the backbone of the rack. I probably should have gotten some pictures of how I laid out the holes for mounting to the ceiling joists and also the guitar hanger supports, but I didn't. I believe you'll see that given how simple it is, it's pretty easy to suss out your own design and measurements.
Functionality is key in this instance, not beauty. Although, since I find myself hopelessly in love with countersinks, I did countersink all the screw holes. Only a few will even be visible. Sigh.
The main board is a 1x3 about 36 inches long. There will be 5 vertical pieces that hooks/hangers attach to. I measured some guitars and decided on about 8 1/2 inches center to center on the vertical 'posts.' You may find you can get by with a tighter spacing. Certainly if you're hanging only thin electric guitars, you won't need that much clearance.
The second set of holes are spaced to fit the distance apart my ceiling joists are. Which should be 16 inches, but my house is old so sometimes things are not quite that precise. I marked the board (note the pencil marks...) and used that as a reference for laying out that set of holes.
This is one of the vertical hanging pieces - another hunk of 1x3. About 9 inches long I believe. I measured some headstocks and figured I needed that much for clearance from the hook to the ceiling.
What I'm describing should become clearer momentarily.
The hole near the bottom is where the hooks will thread in.
Oh, look! I took a picture of the hangers I'll be using. Got these at The Despot. They have a rubberized material on them. Which is great for
hanging tools on, but that type of rubber/plastic/vinyl covering is notoriously bad for fine instrument finishes. So I'm going to put some velour, from my instrument-case-lining-padding stash, on them.
I used some Weldwood spray contact cement on the hooks. Works really well on fabric.
Both surfaces - the hooks and the fabric - need to be sprayed. I just did a light coat on the velour - I didn't want it to soak through and make a big mess.
My apologies for the bad picture. Hard to photograph this while holding a piece of fabric with sticky adhesive on it and a camera in your other hand.
This is a strip of velour going onto a hook. I wrapped the strip around the hook like you might wrap a bandage on your arm, or a piece of bacon around a hot dog. Mmmmm bacon dog.
I needed to drill pilot holes into the ceiling joists. And look! I actually made the board square to the joists.
Back over at the bench we can assemble the vertical pieces to the backbone.
Then I put the mounting screws into the backbone so I could easily drive them into the joists without fumbling too much.
Here's how the backbone is attached to the ceiling. If you don't have exposed beams, you could use a stud finder to find the beams and then drive your screws right though your drywall (or plaster if your house is like mine) to mount the thing.
I used that masking tape so I'd be able to find my pilot holes! I always have heck of a time finding holes up there - too dark.
For what it's worth, I used #10 screws for the assembly.
Here's the whole contraption mounted on the ceiling. I told you it was simple! I don't think it could get any more basic than this.
Now we trim some of the excess velour from the hooks.
I think this is a good idea for any kind of instrument stand - most folks have some of those inexpensive floor stands and they would benefit from this treatment. Only takes a minute to do and you'll have peace of mind. I've heard bad stories about instruments whose finishes got blemished by cheap stands or hangers.
Almost there. Just thread the hooks into the stand.
Here's the finished hanger thingy.
Is it a hanger? A stand? A hook? Not sure what to call it actually.
Maybe it's a ceiling rack?
One thing I know is it ain't pretty. But it works.
And already it's filled up with guitars.
I need another one now.
Gets them up off the floor where they're relatively safe. And of course now I see them every day and am reminded of the work that needs to be done on them.
Here's another angle that shows the guitars better.
From front to back: TWO (count 'em) ca. 1910 Lyon & Healy 'Concert' size guitars - 13 inch lower bouts, about 4 inches deep. Solid spruce over birch. I believe they both are model 740s, but I'm not 100% sure yet. Both need major work - neck resets, cracks, you name it. At least one will have to be refinished, unfortunately.
Next is a 1930s May-Bell tenor guitar. Back needs to be reglued and it also needs a neck reset. It's also spruce over birch.
Near the back is a 1950s Kay jumbo - really fancy. Needs a neck set and general attention. I'll put a truss rod in the neck too.
Finally is a Guild F-50 which needs some finish touchup.


0 comments:
Post a Comment