In the last post, I mentioned I'm going to put a Stratoblaster into the Daddy-O Yellow Danelectro DC-2. Let's get on with it, shall we?
The Stratoblaster is an FET booster that runs off a 9 volt battery. It was originally designed by Alembic, and can be installed inside a guitar or in a pedal. It provides up to 20 dB of clean gain - just the thing for lowish-output pickups such as those in a Stratocaster - hence the name.
I'm fairly sure the first customer was Jerry Garcia as he was playing Strats at the time this circuit was invented.
Anyway, it's a simple circuit and the schematic is out on the interwebs. I procured a nice kit from General Guitar Gadgets. J.D. Sleep, the fellow behind GGG, has made a couple of nice upgrades to the circuit, so I went with his kit, which you can see above.
I felt like a Danelectro would be a good candidate for this addition - since the famous 'lipstick' pickups are pretty low output and a booster would provide some 'oomph' when needed.
Here we are testing the Blaster after populating the PCB. Worked great right away.
Now we need to mod the DC-2 to install the Blaster into it.
I think it's ok now to call it a Danoblaster.
You may recall back when I made the new pearl pickguard that I made an extra hole. I'm going to relocate the output jack more to the right, and use the former output jack spot for the Danoblaster push-pull switch/gain pot.
I used the pickguard as a template to start the new hole in the guitar body for the output jack using a Forstner bit.
The tip of the bit made a good centering mark. The I took the body over to the drill press and finished the hole.
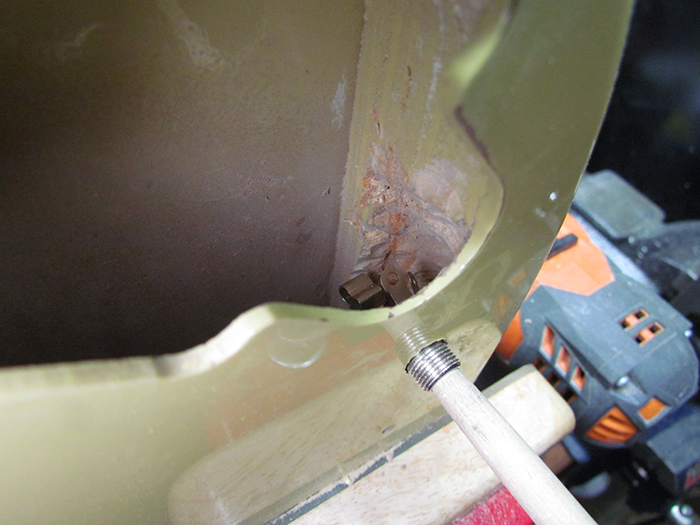
Turns out the plywood internal rim on the body would interfere with the output jack. The arrow in the picture shows the area that will need to be cut away for the jack to fit.
This is also an opportunity to see the famous Danelectro plywood internals!
I made some rough marks on the top and inside the body so I'd know how much material to remove in order for the jack to clear.
I figured I'd cut the material away with a chisel. I keep my chisels sharp, but I had a hard time getting a good angle on the cut I needed.
At this point, I was wondering how
Sven from Argapa or
Toy Making Dad - actual craftsmen - would approach this job.
It did help to whack the chisel with my rubber mallet to really drive the chisel into the plywood.
Although it was probably my head that needed the whacking.
After getting some material removed, it dawned on me that I could grind the semi-circle shape I needed with my trusty Dremel, armed with an angle attachment.
Well, it ain't purty, but it is functional.
The jack has plenty of clearance as you can see on the test install.
Made a fair amount of wood chips and sawdust during the process.
If you do instrument repairs, you probably use toothpicks to apply glue or paint or even lubricant.
I just got these very nice Japanese bamboo '
repair picks' to use in place of toothpicks. Stew-Mac markets them as 'repair picks,' but if you search the interwebs, you'll find they are actually skewers!
Another instance where an item intended for one purpose can be used for guitar repair.
At any rate, I was going to use them to put glue under the binding tape on the guitar where it was lifting up as it is prone to do.
But the more I peeled back the area that had lifted, the bigger the area got. So I wound up using a brush for the glue instead.
The cool skewers will have to wait for another day.
Taped the reglued area down.
The tape in the cutaways on Danelectros is really prone to lifting. Doesn't like to stay stuck down on those curves.


Hi, just came across your post. I used some textured vinyl tape to cover the seam on a resoglass guitar. It worked great except in the concave places where it is lifting a little. And I do mean a little, maybe areas .375" long. What kind of glue did you use to stick down your tape? Did it end up holding foe the long haul?
ReplyDelete