It seems I've accumulated a bunch of recording rack gear, and I wanted to put it all, well, in a rack. I looked online and was frightened off by the cost of racks made of MDF, so I said to myself, "Self, you could MAKE one of those!" When that conversation happens, the result is usually trouble.
Anyway, after pricing some real hardwood (Oak) at the local Despot, I decided to go the cheap route and just use pine. If it turns out to be a disaster, I won't have spent too much. I did, however spring for the extra few bucks to get clear pine.
Armed with my trusty Ridgid circular saw, I did some measuring, and then went off to cut up my nice clear pine.
You may be able to see how I just used a large roofing square clamped to the board to work as a fence. Worked pretty well.
While I was cutting, the famous Elli the Cat showed up to lend a paw and provide general supervision.
She scrambled for cover when I started up the saw.
With the boards cut to length, it's down to The Dungeon to assemble them.
I need to pick one of my 3 Ridgid drill/drivers (don't even ask) to drill the dowel pin holes. I have 2 new 12 volt (smaller) tools, which didn't have quite enough torque as it turns out. I wound up using my old 18 volt world-beating Fuego (in the back) for this job.
Since I'm
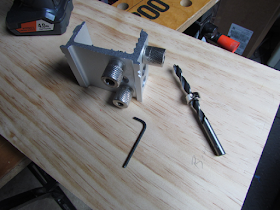
Here's the dowel jig. Basically you use it to align where you'll drill the dowel holes into your mating pieces of wood.
Run the drill bit through the jig to the depth you need to drill. In my case, I have 1.5 inch dowels, so I need to drill half that distance, or 3/4 of an inch on each side.
The jig comes with a drill stop which you set based on the measurement you too above. Meaning, you compensate for the depth of the hole and the thickness of the guide in the jig.
Then insert the pins into the holes you've drilled.
I have one end of the board which will squarely align onto another board. With these pins in the holes, align the boards, then tap the one with the pins and it will make marks on the mating board.
Then drill those holes as you did above.
Test fitting the dowels. You can see the dowels inserted on the end of one board, and the matching holes on the other board (green arrow).
Simple but effective.
My boards are only 1/2 inch thick, so I needed to ensure I didn't drill all the way through them. That's where the jig really helps.
The cabinet is really simple in design. Just 2 sides and a top and a bottom.
Before I glued it all together, I routed a rounded edge on the front and side edges, which is where the little router table I made came into play.
After a dry fit/test run, we put Titebond on the joints. Make sure to get glue down into the dowel holes, then put the dowels into place.
Glue squeeze out is a good thing!
Wipe off the excess with a clean damp rag.
The trickiest part of this whole assembly was getting the whole thing square. It's fairly tall (I'm putting a 20 space rack in it), so it wanted to wobble, even with the dowels in place.
Here's what I wound up doing to keep it square and clamped up (or down, as the case may be).
I clamped two aluminum squares at the bottom to keep the sides aligned. I used my only band clamp (note to self: a couple more would be a good thing...) to told one top corner down tight.
And finally I used a heavy weight, in this case, my URM-25D, on the top to hold the other top side down. (That's the big box on the top right).
It does look a little goofy, but darned if it didn't work perfectly. I did check the top for square as well - it's all aligned.


No comments:
Post a Comment