 I have this old Valco amplifier chassis that I'm going to recap. Should be a pretty easy project I think.
If you do a search for "Valco" or "Supro" on that famous internet auction site, you may see some amps listed for sale which have this same chassis. I don't know the model number, since there isn't one printed on it!
It seems Valco made a few variations of this amp. This particular variant has a 6SL7 preamp tube, a single 6V6 output tube and a 5Y3 rectifier. You can also see it has three inputs - two labelled "instruments" and one labelled "microphone." It also has volume and tone controls. It probably puts out about 3.5 watts or so.
I've seen a similar model, but with a single volume control and with push-pull 6V6s, and I believe there is also a version with the same push-pull output stage with both volume and tone controls.
I did find a schematic on the interwebs which seems to be the correct one for this amp, but it's so darn simple that it's pretty easy to follow.
True point-to-point wiring, just a couple terminal strips to connect stuff to.
I really like old tube sockets that have the tube type printed right on them.
Note the use of rivets to mount the sockets too - no nuts and bolts here. Cheaper to build this way. And probably less labor intensive, if you think about it. Save those pennies where you can.
The AC cord is a 2-prong one replaced many years ago. You see the splendid replacement job - instead of running the lead through the hole in the tab, our repair guru just soldered it to the tab, and also saved money by using as little solder as possible.
I'll replace that cord with a modern 3-prong grounded cable.
Here's part one of the restoration: unsoldering and removing the can capacitor.
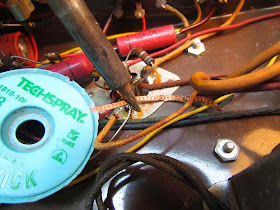
I use desoldering wick to get the old connections off the filter cap can. Make a drawing of what goes where so you won't forget later and blow everything up!
Everything's disconnected from the cap terminals. Now I need to unsolder the mounting tabs from the chassis.
Sometimes you see these tabs soldered and sometimes you don't. Fender is famous for using massive quantities of solder on these things.
In any event, I need my big 175-watt soldering iron to melt the solder blobs in order to remove them.
That iron gets super hot and requires a lot of care while maneuvering it around. It's easy to touch something you don't want to touch and burn or melt it. That includes your fingers.
Here's the solder removed from the can's mounting tabs (green arrows). Untwist the tabs to straighten them out and the can can be removed from the chassis.
Here we have the can after removal. I left those 2 resistors on for now. I want to replace them with modern 2 watt versions, so I need the old ones as a reference.
It's not really necessary to change them out, but the old ones are rated for 1/2 watt, and I like the peace of mind of bigger ones.
The last time I opened up a can like this, I said I was going to try using a pipe cutter. I've been using kitchen knives for this lately.
The pipe cutter works ok, but it leaves a bigger seam I think. This can is actually fairly small in diameter (about 7/8 or an inch or maybe 20mm), so the pipe cutter was a little tricky to handle - it kept slipping off, so my cut wasn't the cleanest.
I'd like to try the cutter on a bigger can to see if it actually works better or worse than a knife.
Anyway, here's the freshly opened can.
I just hack the innards off the base. Use gloves to handle the innards. There are no PCBs there, but it's still not something you want to touch with your bare hands.
I save the innards in a container and then take them to my local dump and put them in the hazardous waste disposal.
In addition to the actual capacitor innards, there was some tar in the top of this one. I believe this stuff was used as both an adhesive and as a moisture barrier.
I scraped it out because this can is small and I'm going to need all the space I can get to mount new caps.
New caps...umm...yeah.
The original can had 3 10uf @ 450 volt sections. I figured I'd put a 22uF in for the first section for some extra filtering, and then two 10 uFs.
Nope.
The caps I have on hand are too big! Even 3 10uFs won't fit. First time I've had this problem, but as I say, this can is narrow.
So I went to the Mouser site and ordered up some smaller ones that will fit. So I'm in a standstill for a couple days until I get my new caps.


No comments:
Post a Comment