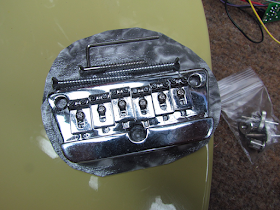
You may recall that I installed a CJ Tooling bridge on the Cancer Killer Danelectro guitar. I had intended to put one on this guitar as well. Unfortunately, I don't have one for this guitar since CJ Tooling has been closed for a couple of months due to 'unforseen circumstances.' I hope all is well there.
In the meantime, I'm retrofitting this guitar with a stock Danelectro 6-saddle bridge of the type that's found on some other Danelectro models.
One of the issues with virtually any Danelectro bridge is their tendency to sag in the center under string tension. The stock bridge on this guitar was doing that. So in addition to having better intonation, I want to solve the sag problem.
Did a search of the interwebs and found a video by my guitar repair hero, Dan Erlewine, in which he modifies a stock Danelectro bridge to fix the sag. It's easy to do, and I simply followed his direction.
This is the new bridge in its factory packing. It comes with mounting screws and a hex wrench to adjust the height of the saddles.
TMD's parental units had a huge collection of allen wrenches like this which they willed to him. I'm going to donate this to the collection.
What we're going to do is put a Gibson Nashville-style Tune-o-Matic threaded bridge insert and stud on the guitar body to support the center of the bridge. Simple and effective, as well as adjustable.
First we make a center mark where we'll drill a 5/32 inch hole for the top of the stud to pass into.
Over on the drill press we drill the hole. Lookit that brass swarf coming up! (The bridge is chrome-plated brass and is very easy to drill).
I screwed the bridge down to a caul and clamped the caul to the drill press table so it wouldn't move while being drilled.
Now we put the stud through the bridge and make a mark level with the top of the bridge. I used a razor saw to scribe the stud.
The excess stud has to be cut off so it doesn't interfere with strings or the bridge saddles.
At this point, you can see how clever and simple the idea is and how well it will work. We'll have a support right at the point where the stock bridge tends to sag under tension.
Since the caul has a hole drilled in it which is the same size as the stud, we can use it as a support to cut the excess off.
It cut easily with the razor saw.
Take off any sharp edges left from the cut with a file.
Test fit - the stud is perfectly level with the top of the bridge.
I'm not a big fan of chrome bridges. It's hard to 'age' chrome (ferric chloride works on nickel but not so much on chrome). I guess I'll have to settle for natural aging over time.
Now we put the bridge on the guitar body temporarily using the mounting screws. I put a wedge under the rear of the bridge so the front of the bridge would be flat to the body of the guitar and the hole would be square.
Then I drilled the pilot hole for the threaded bushing that will be pressed in. The hole should be about 9/32 to have a tight fit for the bushing.
This is again a 5/32 inch bit. After this hole, I drilled it again with a 7/32 to open it up more. I don't have a 9/32 bit, so I used a 1/4 inch bit and then used a file to ream the hole large enough to press the bushing in.
The bushing should be a tight fit. I reamed the hole until I could get the bushing to sit about halfway down in the hole.
Then I used a rubber mallet to drive the bushing all the way in.
Thread the stud into the bushing, and then screw the bridge down. The bridge is very solid now that it's supported at 4 points.
I'll probably need to adjust the bridge height upward during the final setup. I'll be able to use the roller on the stud to adjust it to support the final bridge height exactly.


No comments:
Post a Comment