As a general rule, I don't make irreversible modifications on vintage instruments. That usually means not drilling large holes and adding stuff. Now, I did put a K&K pickup on the Martin O-18T recently, mainly because someone had already hacked the end pin hole out to over 1/2 of an inch.
Today I am going to break my rule and do a semi-reversible modification. I'm going to install a K&K Aloha Twin pickup on this prewar Martin 1-T. Mainly because: it's rather beaten up to start with, Martin made a zillion of them (not like it's rare) and because it would be very useful to have a pickup on one of my Martins.
K&K pickups are simply amazing. First, they sound like whatever acoustic instrument you've put them on, light years better than those horrendous undersaddle pickups. And the folks at K&K also do a fantastic job of giving you everything you need to do the installation.
The Aloha Twin is the best example I've seen yet. The method of installation is simple yet very clever, and you get everything you need to do it. You can see in the picture that you get some CA (super glue) as well as latex "finger cots" so the pickups don't stick to your fingers! The pickup heads are appropriately ukulele-sized and the leads to the jack are nice and short. Really well thought out.
Here's how we install it, following the K&K instructions.
Make sure you can reach the bridge pad of the ukulele. This is actually the hardest part. If your hands won't fit into the soundhole, and/or your fingers just won't reach it, you'l need to find someone whose hands will work. In my case, I found an extremely capable assistant.
Put one of the finger cots on your (or your assistant's) index or middle finger. Then put a tiny drop of CA on the finger cot near the end. We found it needed to be at the very end of the finger - your mileage may vary.
Then attach one of the pickup heads to the glue. Trust me on this part.
Do a test run to get a feel (get it?) for the placement of the pickup head. Since the Martin has bridge pins, it was easy (for my assistant) to find the correct spot under the saddle between the first and second strings.
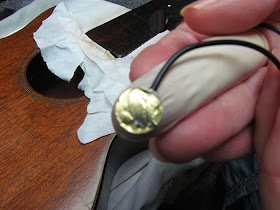
After a test run or two, spread CA on the gold foil on the pickup and then put it in place under the saddle, and hold it there for 30 seconds.
Gently pull your hand away. The glue on the cot will stay in place and tear a tiny bit of latex off and it will remain on the pickup. No big thing - it won't affect the tone and nobody will see it.
Well, nobody will see it unless you take a mirror picture of it and put it on the interwebs!
Here is it - it's perfect! See what I mean about the clever way to install it?
It would be easy to remove it if you wanted to - but why would you?
Now the end pin jack. I wasn't sure if the pickup attachment would succeed, so I waited to ream the hole.
This is the part I mentally debated the most. In the end, I figured, it's my uku, it's going to add great function, and the hole could be plugged if someone wanted to remove the jack. Compared to some of the hack jobs you see, this is pretty acceptable, and it's not a hack job.
I carefully measured, poinked a spot with an awl, and then drilled out the end block with a 1/4 inch drill, being careful to keep it level and square.
Now the real fun starts!
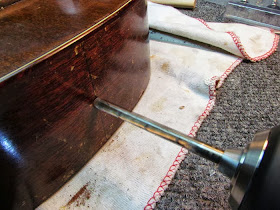
I used my Stew-Mac (still waiting for my endorsement deal...) end pin reamer to ream out the hole.
Contrary to the hack jobs with a drill bit we've all seen, this puppy is gold. It's not cheap, but it's a beautifully made tool and you'll get a first-class result. If you do this for customers, it will pay for itself after the first job.
The reamer goes from 1/4 inch up to 1/2 inch, which is the size we need for the jack.
I chucked it up in my trusty Fuego drill and had at it. Went slowly. Was careful to keep it square and level.
Be-you-tih-ful.
No chips, no hacks, just a perfect hole.
Goes to show that having the right tool for the job pays off.
All that remains is to pull the jack though with my amazing T.V. Jones jack threader dowel device. Another company making fantastic pickups and helping you do a pro installation.
I thread on the outside washer, nut and the strap button...
...and it's done.
Looks good I think. The pickup works. I can't really give it a full test yet, but it passes the 'thump on the top' test with flying colors.
Next up - the refretting and installing new Waverly tuners.
I leave you with this picture.
This is art. I could look at this for hours.


Just finished an installation after reviewing your instructions. They were quite clear and helpful. All went very well. Thanks!
ReplyDeleteGlad to hear it, and thanks for reading. K&K make great pickups!
ReplyDelete