I've gone into more detail on neck resets in other posts, so I'm not going to repeat it all here. I calculated the amount of material to remove from the bottom of the heel, using the Erlewine neck reset formula. It came out to .02 inches, or about .5mm. I'll take that amount of the bottom of the heel, and then gradually less as the heel goes up toward the fingerboard. Think of it as a small thin pie shape.
Mmmm. Pie. Maybe you don't want to think about pie when you're doing this. Just saying.
I drew a pencil line with my mechanical pencil right at the bottom of the heel. The width of the line is amount I need to take off - much less than you probably would with a guitar.
Then I just made an angle cut across the heel to serve as a guide as to the depth.
I didn't want to use a chisel for the cut on the sides, since it's such a small amount.
What I did was use a file and take off a tiny bit - 4 or 5 strokes at a time. Then viewing it from the bottom and the sides, I could judge how much was coming off.
Remember, you can't put material back on.
This is a tedious process - a couple file strokes, eyeball it, then test it on the ukulele.
When the angle of the neck set is correct, I put some carbon paper into the joint. Any high spots on the dovetail will get carbon marks on them.
Here you can see some marks on the dovetail. Now we use a scraper to take away just those marks.
This is another back-and-forth, test the fit operation. It take a while, but soon the fit will be tight and the angle will be correct.
Then, with some sign-painter's tape on the body of the guitar to protect it, I pull some sandpaper through the neck-to-body joint. This will sand the contour of the neck to that of the body.
I used 220 grit paper for this - I wouldn't go below that or you may take too much off.
Now we're ready to glue the neck back on.
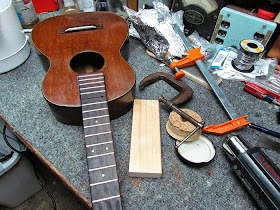
I heat up my hide glue (it's in the white container on the left). And I gathered up some cauls and clamps. I strongly suggest doing a 'dry run' before you actually glue it all up.
You'll also see the heat gun on the lower right in the picture. I like to warm up the joints before I glue. Hide glue starts to set at a temperature of 90 degrees F. If the joint is warmed up a bit, you have more time to work before the temperature goes down.
Here it is after gluing and clamping it up. The orange clamp is holding the neck joint - there's a caul under the body as well. And there is also a caul inside the body for the second clamp on the fingerboard extension.
After having cauls fall off many times just when I was about to clamp them down, it finally hit me that I should tape them down! That's the blue tape in the pictures. I 'destuck' it some on my shirt first so it wouldn't hurt the delicate finish. Then when everything was clamped up, I took the tape off.
While the glue is still hot, I also clean up as much squeeze-out as I can with a damp cloth...or q-tip. If you don't have squeeze-out you probably didn't put enough glue in the joint.


No comments:
Post a Comment